Chapter 1. Hello, ATL
Welcome to the Active Template Library (hereafter referred to as ATL). In this chapter, I present a few of the tasks that you’ll probably want to perform using ATL and the integrated wizards. This is by no means all of what ATL can accomplish, nor is it meant to be exhaustive coverage of the wizards or their output. In fact, the rest of this book focuses on how ATL is implemented to provide the Component Object Model (COM) glue that holds together this example (as well as several others). This chapter is actually just a warm-up to get you familiar with the support that the Visual Studio environment provides the ATL programmer.
What Is ATL?
Expanding the acronym doesn’t completely describe what ATL is or why we have it. The Active part is actually residue from the marketing age at Microsoft, when “ActiveX” [1] meant all of COM. As of this writing, “ActiveX” means controls. And although ATL does provide extensive support for building controls, it offers much more than that.
ATL provides:
Class wrappers around high-maintenance data types such as interface pointers,
VARIANTs,BSTRs, andHWNDsClasses that provide implementations of basic COM interfaces such as
IUnknown,IClassFactory,IDispatch,IPersistXxx,IConnectionPointContainer, andIEnumXxxClasses for managing COM servers – that is, for exposing class objects, performing self-registration, and managing the server lifetime
Classes for building COM controls and COM control containers, as well as for building plain old Windows applications
An enormous library of classes for building web applications and XML web services
Wizards, to save you typing
ATL was inspired by the current model citizen in the world of C++ class libraries, the C++ Standard Library. ATL is meant to be a set of small, efficient, and flexible classes. However, all this power requires a bit of skill to fully harness. As with the standard C++ library, only an experienced C++ programmer can use ATL effectively.
Of course, because we’ll be programming COM, experience using and implementing COM objects and servers is absolutely required. For those of you hoping for a way to build your COM objects without COM knowledge, ATL is not for you (nor is Visual Basic, MFC, or anything else, for that matter). In fact, using ATL means being intimately familiar with COM in C++, as well as with some of the implementation details of ATL itself.
Still, ATL is packaged with several wizards that are helpful for generating the initial code. In the rest of this chapter, I present the various wizards available for ATL programmers as of Visual Studio 2005. Feel free to follow along.
Creating a COM Server
Creating an ATL Project
The first step in any Visual Studio development endeavor is to build the solution and the initial project. Choosing File, New Project displays the New Project dialog box shown in Figure 1.1, which focuses on Visual C++ projects.
Figure 1.1. Creating a new Visual Studio project
![[View full size image]](_static/images/01atl01_alt.jpg)
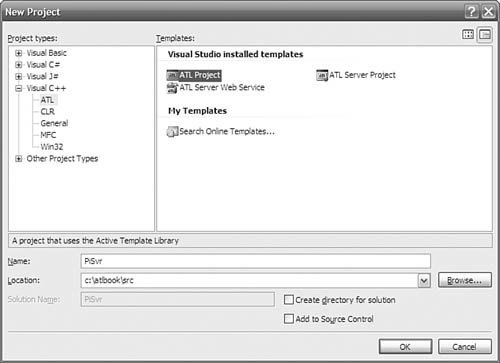
Selecting the Visual C++ Projects folder
displays the various types of C++ project templates available. The
name of the project (shown in the figure as PiSvr) is the
name of your generated DLL or EXE server.
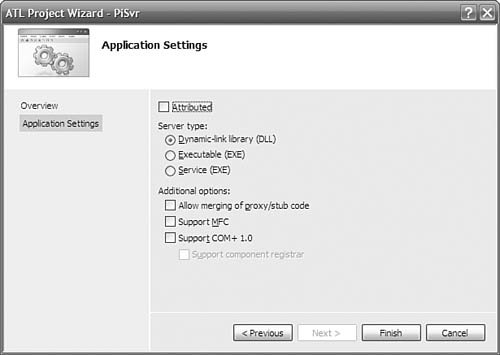
The job of the ATL Project Template is to build a project for your COM server. A COM server is either a dynamic link library (DLL) or an executable (EXE). Furthermore, the EXE can be a standalone application or an NT service. The ATL Project Template supports all three of these server types. By default, a DLL server is selected as shown in Figure 1.2.
Figure 1.2. Project settings for an ATL project
![[View full size image]](_static/images/01atl02_alt.jpg)
ATL Project Wizard Options
The ATL Project Wizard in Figure 1.2 lists several options that merit discussion. The first option sets up the project to use ATL attributes. As described in the Preface, nonattributed projects are preferred in ATL 8, so we concentrate on nonattributed projects in this book. If you decide to use attributes anyway, see Appendix D, “Attributed ATL,” for coverage of attributed projects.
In the Additional Options section, the first
option enables you to bundle your custom proxy/stub code with your
DLL server. By default, this option is not selected. As a result,
Visual Studio generates a separate project named
<projectname>PS.vcproj for the proxy/stub and adds
it to the solution for your server. This project is for building a
separate proxy/stub DLL to distribute to all client and server
machines that need to marshal and unmarshal your custom interfaces.
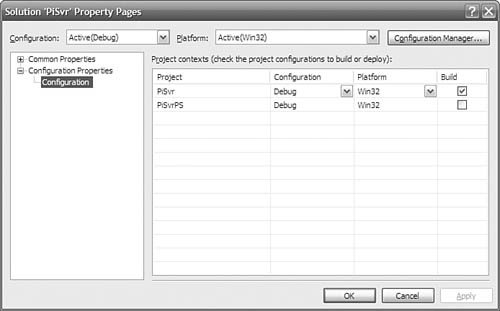
However, the proxy/stub project is not selected to be built in
either of the default build configurations (Debug, Release) for the
solution, as you can see from the property pages for the solution
in Figure 1.3. Checking
the Build check box next to the proxy/stub project causes this
project to be built along with the main server whenever the
solution is built.
Figure 1.3. Application settings for a new ATL COM server
![[View full size image]](_static/images/01atl03_alt.jpg)
If you want to bundle the proxy/stub DLL into
the server DLL (requiring the server to be installed on the client
machine), you can check the Allow Merging of Proxy/Stub Code option
(for nonattributed projects). Doing so results in a solution with
only a single project (the one for your main server), with a bunch
of conditionally compiled statements inserted into your server code
to merge the proxy/stub code. The preprocessor definition
_MERGE_PROXYSTUB controls whether the proxy/stub code is
compiled into the server; this definition is added to all project
configurations by default.
Unless you have a good reason (which is beyond the scope of this book), you’ll want to avoid the option to merge the proxy/stub code into your server, instead preferring dual or oleautomation-compatible custom interfaces.
The second ATL Project Wizard option enables you to use the Microsoft Foundation Classes (MFC). Frankly, you should avoid this option. The following are a few common objections developers have to turning off this check box:
“I can’t live without
CString(orCMap,CList, and so on).” The MFC utility classes were built as a stopgap until the C++ standards committee defined a standard library. They’ve done it, so we can stop using the MFC versions. The classesstring,map,list, and so on provided in the standard library are more flexible and more robust than their MFC equivalents. Moreover,CStringis now a shared class between MFC and ATL, and thus is available in ATL projects without having to include the rest of MFC and link to the MFC library. Other MFC utility classes have also been made shared, including CPoint and CRect. And for those who liked the MFC collections classes, ATL now includes MFC style collections (CAtlMap, CAtlList, and so on).“I can’t live without the wizards.” This chapter is all about the wizards that Visual Studio provides for ATL programmers. The ATL wizards are arguably as extensive as the ones MFC provides.
“I already know MFC, and I can’t learn anything new.” Luckily, none of these people are reading this book.
The third ATL COM AppWizard option, Support
COM+, causes your project to link to the COM+ component services
library comsvcs.dll and includes the appropriate header
file comsvcs.h so that your server can access the various
interfaces that comprise COM+. With Support COM+ selected, you can
also check the option Support Component Registrar, which generates
an additional coclass in your project that implements the
IComponentRegistrar interface. [2]
Results of the ATL Project Wizard
With or without these three options, every COM
server that the ATL Project Wizard generates supports the three
jobs of every COM server: self-registration, server lifetime
control, and class objects exposure. As an additional convenience,
the wizard adds a post-build event that registers the COM server
upon each successful build. This step runs either regsvr32.exe <project>.dll or <project>.exe /regserver, depending on whether it is a DLL or EXE
server.
For more information about ATL’s support for the three jobs of every COM server, as well as how you can extend it for more advanced concurrency and lifetime needs, see Chapter 5, “COM Servers.”
Inserting a COM Class
Adding an ATL Simple Object
When you have an ATL COM server, you’ll probably want to insert a new COM class. This is accomplished by selecting the Add Class item in the Project menu. When inserting an ATL class, you first have to choose the type of class you want, as shown in Figure 1.4.
Figure 1.4. Adding an ATL COM class
![[View full size image]](_static/images/01atl04_alt.jpg)
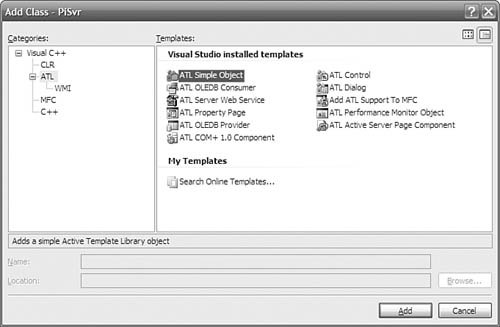
If you’re following along, you might want to take a moment to explore the various types of classes available. Each of these classes results in a specific set of code being generated, using the ATL base classes to provide most of the functionality and then generating the skeleton for your own custom functionality. The wizard for a particular class type is your chance to decide which interfaces you want your COM class to implement. Unfortunately, the wizard doesn’t provide access to all the functionality of ATL (or even most of it), but the generated code is designed to be easy for you to add or subtract functionality after it has gotten you started. Experimentation is the best way to get familiar with the various wizard-generated class types and their options.
After you choose one of the class types (and press OK), Visual Studio generally asks for some specific information from you. Some of the classes have more options than the ATL Simple Object (as selected in Figure 1.4), but most of the COM classes require at least the information shown in Figures 1.5 and 1.6. [3]
Figure 1.5. Setting COM class names
![[View full size image]](_static/images/01atl05_alt.jpg)
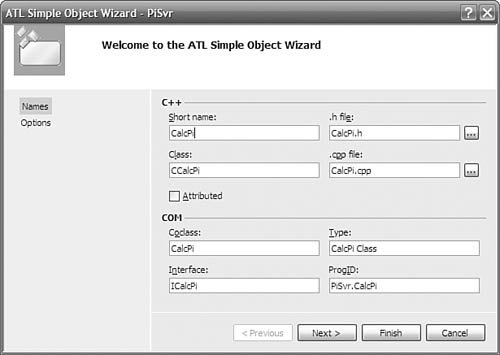
Figure 1.6. Setting COM class attributes
![[View full size image]](_static/images/01atl06_alt.jpg)
The Names tab of the ATL Simple Object Wizard
dialog box requires you to type in only the short name, such as
CalcPi. This short name is used to compose the rest of the
information in this dialog box (which you can override, if you
choose). The information is divided into two categories. The
necessary C++ information is the name of the C++ class and the
names of the header and implementation files. The necessary COM
information is the coclass name (for the Interface
Definition Language [IDL]); the name of the default interface (also
for the IDL); the friendly name, called the Type (for the IDL and
the registration settings); and finally the version-independent
programmatic identifier (for the registration settings). The
versioned ProgID is just the version-independent ProgID with the
“.1” suffix. Note that the Attributed option is not selected. In a
nonattributed project, we have the option of selectively adding
attributed classes to our project via the Attributed check box in
Figure 1.5.
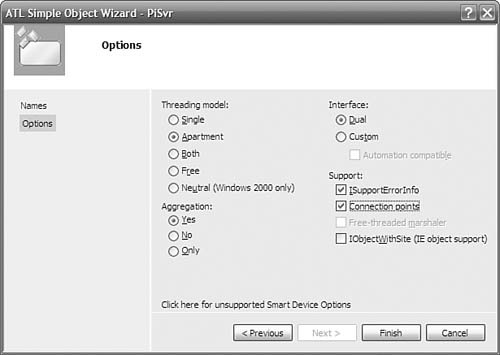
The Options page is your chance to make some
lower-level COM decisions. The Threading model setting describes
the kind of apartment where you want instances of this new class to
live: a single-threaded apartment (STA, also known as the Apartment
model), or a multithreaded apartment (MTA, also known as the
Free-Threaded model). The Single model is for the rare class that
requires all its objects to share the application’s main STA,
regardless of the client’s apartment type. The Both model is for
objects that you want to live in the same apartment as their
clients, to avoid the overhead of a proxy/stub pair. The Neutral
threading model is available only on Windows 2000 (and later) and
is useful for objects that can safely execute on the thread of the
caller. Calls to components marked as Neutral often execute more
quickly because a thread switch is not required, whereas a thread
switch always occurs with cross-apartment calls between other types
of apartments. The Threading model setting that you choose
determines the value for the ThreadingModel named value
placed in the Registry for your server; it determines just how
thread safe you need your object’s implementation of
AddRef and Release to be.
The Interface setting enables you to determine
the kind of interface you want the class’s default interface to be:
Custom (it needs a custom proxy/stub and does not derive from
IDispatch) or Dual (it uses the type library marshaler and
derives from IDispatch). This setting determines how the
IDL that defines your default interface is generated. Custom
interfaces can further be qualified by selecting the Automation
Compatible option. This option adorns the IDL interface definition
with the [oleautomation] attribute, which restricts the
variable types that your interface’s methods can use to OLE
Automation-compatible types. For instance, [oleautomation]
interface methods must use the SAFEARRAY type instead of
conventional C-style arrays. If you plan to use your ATL COM object
from several different client environments, such as Visual Basic,
it is a good idea to check this option. Moreover, accessing COM
objects from code running in the Microsoft .NET framework is much
simpler if [oleautomation] interfaces are used. Deploying
your COM object might also be simpler with the use of
[oleautomation] interfaces because these interfaces always
use the universal marshaler to pass interface references across
apartments. The type library marshaler always is present on a
machine that supports COM, so you don’t need to distribute a
proxy/stub DLL with your component.
The Aggregation setting enables you to determine whether you want your objects to be aggregatable – that is, whether to participate in aggregation as the controlled inner. This setting does not affect whether objects of your new class can use aggregation as the controlling outer. See Chapter 4, “Objects in ATL,” for more details about being aggregated, and Chapter 6, “Interface Maps,” about aggregating other objects.
The Support ISupportErrorInfo setting directs
the wizard to generate an implementation of
ISupportErrorInfo. This is necessary if you want to throw
COM exceptions. COM exceptions (also called COM Error Information
objects) enable you to pass more detailed error information across
languages and apartment boundaries than can be provided with an
HRESULT alone. See Chapter 5, “COM Servers,” for more information
about raising and catching COM exceptions.
The Support Connection Points setting directs
the wizard to generate an implementation of
IConnectionPoint, which allows your object to fire events
into scripting environments such as those hosted by Internet
Explorer. Controls also use connection points to fire events into
control containers, as discussed in Chapter 9, “Connection Points.”
The Help information for the Free-Threaded Marshaler setting reads as follows: “Allows clients in the same interface to get a raw interface even if their threading model doesn’t match.” This description doesn’t begin to describe how dangerous it is for you to choose it. Unfortunately, the Free Threaded Marshaler (FTM) is like an expensive car: If you have to ask, you can’t afford it. See Chapter 6, “Interface Maps,” for a description of the FTM before checking this box.
The Support IObjectWithSite setting directs the
wizard to generate an implementation of IObjectWithSite.
Objects being hosted inside containers such as Internet Explorer
use this interface. Containers use this interface to pass interface
pointers to the objects they host so that these objects can
directly communicate with their container.
Results of the ATL Simple Object Wizard
After you specify the options, the Simple Object Wizard generates the skeleton files for you to start adding your implementation. For the class, there is a newly generated header file containing the class definition, a .cpp file for the implementation, and an .RGS file containing registration information. [4] In addition, the IDL file is updated to contain the new interface definition.
The generated class definition looks like this:
 1// CalcPi.h : Declaration of the CCalcPi
 2
 3#pragma once
 4#include "resource.h"       // main symbols
 5
 6#include "PiSvr.h"
 7#include "_ICalcPiEvents_CP.h"
 8
 9// CCalcPi
10
11class ATL_NO_VTABLE CCalcPi :
12    public CComObjectRootEx<CComSingleThreadModel>,
13    public CComCoClass<CCalcPi, &CLSID_CalcPi>,
14    public ISupportErrorInfo,
15    public IConnectionPointContainerImpl<CCalcPi>,
16    public CProxy_ICalcPiEvents<CCalcPi>,
17    public IDispatchImpl<ICalcPi, &IID_ICalcPi, &LIBID_PiSvrLib,
18        /*wMajor =*/ 1, /*wMinor =*/ 0>
19{
20public:
21    CCalcPi() { }
22DECLARE_REGISTRY_RESOURCEID(IDR_CALCPI)
23
24BEGIN_COM_MAP(CCalcPi)
25    COM_INTERFACE_ENTRY(ICalcPi)
26    COM_INTERFACE_ENTRY(IDispatch)
27    COM_INTERFACE_ENTRY(ISupportErrorInfo)
28    COM_INTERFACE_ENTRY(IConnectionPointContainer)
29END_COM_MAP()
30
31BEGIN_CONNECTION_POINT_MAP(CCalcPi)
32    CONNECTION_POINT_ENTRY(__uuidof(_ICalcPiEvents))
33END_CONNECTION_POINT_MAP()
34// ISupportsErrorInfo
35    STDMETHOD(InterfaceSupportsErrorInfo)(REFIID riid);
36
37    DECLARE_PROTECT_FINAL_CONSTRUCT()
38
39    HRESULT FinalConstruct() {
40        return S_OK;
41    }
42
43    void FinalRelease() {
44    }
45
46public:
47
48};
49
50OBJECT_ENTRY_AUTO(__uuidof(CalcPi), CCalcPi)
The first thing to notice is the list of base classes. In this instance, ATL takes advantage of both templates and multiple inheritance. Each base class provides a separate piece of the common code needed for a COM object:
CComObjectRootExprovides the implementation of theIUnknowninterface.CComCoClassprovides the class factory implementation.ISupportErrorInfois the interface; implementation for the one method is in the .cpp file.IConnectionPointContainerImplprovides the implementation I requested by checking the Support Connection Points check box.CProxy_ICalcPiEventsis part of the connection point implementation.IDispatchImplprovides the implementation ofIDispatchneeded for the object’s dual interface.
The other important thing to note here is the
COM_MAP macros. This is an instance of an ATL map: a set of macros that generate code
(typically to fill in a lookup table). The COM_MAP, in
particular, is used to implement the QueryInterface method
that all COM objects are required to support.
For more information about the base classes that
ATL uses to implement basic COM functionality and how you can
leverage this implementation for building object hierarchies and
properly synchronizing multithreaded objects, see Chapter 4, “Objects in ATL.”
For more information about how to make full use of the
COM_MAP, see Chapter 6, “Interface Maps.”
Adding Properties and Methods
One
of the things that make a C++ programmer’s life hard is the
separation of the class declaration (usually in the . h
file) and the class definition (usually in the .cpp file).
This can be a pain because of the maintenance required between the
two. Any time a member function is added in one, it has to be
replicated in the other. Manually, this can be a tedious process,
and it is made even more tedious for a C++ COM programmer who must
maintain the same definitions in an .idl file. When I’m
adding properties and methods to my interfaces, I’d like my C++
development environment to help translate an IDL method definition
into C++ (with the appropriate ATL attributes, if necessary) and
drop it into my .h and .cpp files for me, leaving
me a nice place to provide my implementation. That’s just what
Visual Studio provides.
By right-clicking on a COM interface in Class
view, you can choose to add a new property or method from the Add
submenu of the context menu that appears. Figure 1.7 shows the dialog box that enables you
to add a property to a COM interface. Parameters to the property
can be added by specifying the parameter data type and the
parameter direction (for example, [in] or
[out]).
Figure 1.7. Adding a property
![[View full size image]](_static/images/01atl07_alt.jpg)
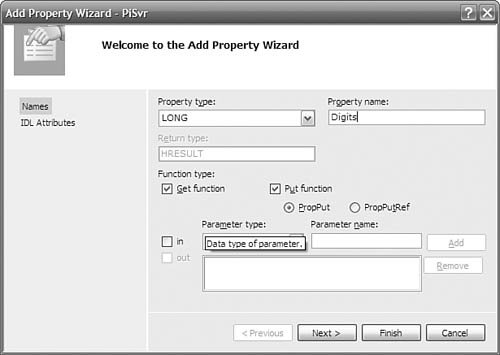
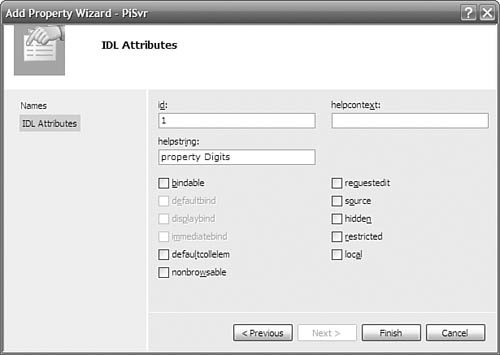
Figure 1.8 shows the options available on the IDL Attributes tab for the Add Property Wizard. Selected attributes are inserted into the appropriate interface definition, in your project’s IDL file. In either case, the effect on the type library is identical. Many of these attributes apply in rare circumstances, so the default selections and values shown in the figure are often suitable. In any event, adding, deleting, or modifying these attributes directly in the IDL file afterward is a simple matter.
Figure 1.8. IDL attributes for a property
![[View full size image]](_static/images/01atl08_alt.jpg)
The following shaded code shows the implementation skeleton that the wizard generates. We have to provide only the appropriate behavior (shown as unshaded code).
 1STDMETHODIMP CCalcPi::get_Digits(LONG* pVal) {
 2  *pVal = m_nDigits;
 3  return S_OK;
 4}
 5
 6STDMETHODIMP CCalcPi::put_Digits(LONG newVal) {
 7  if( newVal < 0 )
 8    return Error(L"Can't calculate negative digits of PI");
 9  m_nDigits = newVal;
10    return S_OK;
11}
Similarly, we can add a method by right-clicking an interface in Class view and choosing Add Method. Figure 1.9 shows the Add Method Wizard. Input and output parameters are added individually using the Parameter Type combo box, the Parameter Name text box, and the Add/Remove buttons.
Figure 1.9. Adding a method
![[View full size image]](_static/images/01atl09_alt.jpg)
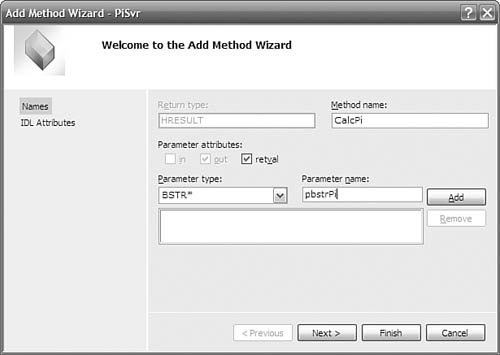
Again, the wizard updates the interface definition in either the IDL file or the header file, generates the appropriate C++ code, and places us in the implementation skeleton to do our job. The shaded code is what remains of the wizard-generated C++ code after I added the code to implement the method:
 1STDMETHODIMP CCalcPi::CalcPi(BSTR* pbstrPi) {
 2  _ASSERTE(m_nDigits >= 0);
 3
 4  if( m_nDigits ) {
 5    *pbstrPi = SysAllocStringLen(L"3.", m_nDigits+2);
 6    if( *pbstrPi ) {
 7      for( int i = 0; i < m_nDigits; i += 9 ) {
 8        long nNineDigits = NineDigitsOfPiStartingAt(i+1);
 9        swprintf(*pbstrPi + i+2, 10, L"%09d", nNineDigits);
10      }
11
12      // Truncate to number of digits
13      (*pbstrPi)[m_nDigits+2] = 0;
14    }
15  }
16  else {
17    *pbstrPi = SysAllocString(L"3");
18  }
19
20  return *pbstrPi ? S_OK : E_OUTOFMEMORY;
21}
For a description of COM exceptions and the ATL
Error function (used in the put_Digits member
function), see Chapter
4, “Objects in ATL.”
Implementing Additional Interfaces
Interfaces are the core of COM, and most COM objects implement more than one. Even the wizard-generated ATL Simple Object, shown earlier, implements four interfaces (one custom interface and three standard interfaces). If you want your ATL-based COM class to implement another interface, you must first have a definition of it. For example, you can add the following interface definition to your project’s IDL file:
 1[
 2    object,
 3    uuid("27ABEF5D-654F-4D85-81C7-CC3F06AC5693"),
 4    helpstring("IAdvertiseMyself Interface"),
 5    pointer_default(unique)
 6]
 7interface IAdvertiseMyself : IUnknown {
 8    [helpstring("method ShowAd")]
 9    HRESULT ShowAd(BSTR bstrClient);
10};
To implement this interface in your project, you
simply add the new interface to your C++ class inheritance list and
add the interface to the COM_MAP:
1class ATL_NO_VTABLE CCalcPi :
2    public ICalcPi,
3    public IAdvertiseMyself {
4
5BEGIN_COM_MAP(CCalcPi)
6    COM_INTERFACE_ENTRY(ICalcPi)
7    COM_INTERFACE_ENTRY(IAdvertiseMyself)
8    ...
9END_COM_MAP()
If methods in the IAdvertiseMyself
interface need to throw COM exceptions, the generated
implementation of ISupportErrorInfo must be modified as
well. This is accomplished by simply adding the IID to the array in
the generated implementation:
 1STDMETHODIMP CCalcPi::InterfaceSupportsErrorInfo(REFIID riid) {
 2    static const IID* arr[] = {
 3        &IID_ICalcPi,
 4        &IID_IAdvertiseMyself
 5    };
 6
 7    for (int i=0; i < sizeof(arr) / sizeof(arr[0]); i++) {
 8        if (InlineIsEqualGUID(*arr[i],riid))
 9            return S_OK;
10    }
11    return S_FALSE;
12}
After you make the updates, you have to implement the new interface’s methods.
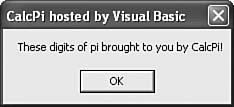
 1STDMETHODIMP CCalcPi::ShowAd(BSTR bstrClient) {
 2  CComBSTR bstrCaption = OLESTR("CalcPi hosted by ");
 3  bstrCaption += (bstrClient && *bstrClient ?
 4    bstrClient : OLESTR("no one"));
 5  CComBSTR bstrText =
 6    OLESTR("These digits of pi brought to you by CalcPi!");
 7
 8  MessageBox(0, COLE2CT(bstrText), COLE2CT(bstrCaption),
 9    MB_SETFOREGROUND);
10
11  return S_OK;
12}
VS provides a convenient wizard to make this process simpler. Right-clicking the class from Class View and selecting Implement Interface from the Add submenu brings up the Implement Interface Wizard, shown in Figure 1.10. This wizard enables you to implement interfaces defined in an existing type library. The wizard is smart enough to pull type libraries from the current project. Alternatively, you can define interfaces in IDL, compile them using MIDL, and implement those interfaces by referencing the resulting type library. The radio buttons enable you to use the type library from the current project, registered type libraries (Registry), or unregistered type libraries (File) that you locate with the Browse button. For our PiSvr project, the type library built from the generated IDL makes the interfaces we’ve defined available to the Implement Interface Wizard.
Figure 1.10. The Implement Interface Wizard
![[View full size image]](_static/images/01atl10_alt.jpg)
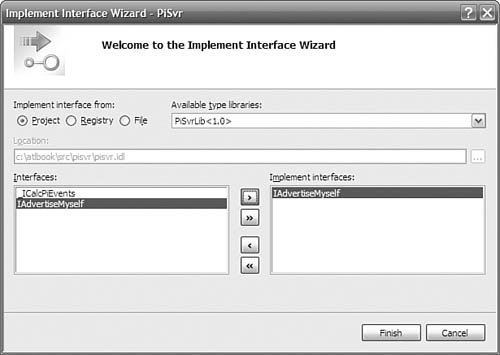
Note that interfaces that have already been
implemented (ICalcPi, in our case) do not appear in the
list of implementable interfaces. Unfortunately, the Implement
Interface Wizard does not support interfaces that don’t exist in
type libraries; this leaves out most of the standard COM
interfaces, such as IPersist, IMarshal, and
IOleItemContainer.
Unfortunately, there’s a bug in this wizard. The wizard did this to our base class list:
1class ATL_NO_VTABLE CCalcPi :
2    //... the usual stuff ...
3    public IDispatchImpl<ICalcPi, &IID_ICalcPi, &LIBID_PiSvrLib,
4        /*wMajor =*/ 1, /*wMinor =*/ 0>,
5    public IDispatchImpl<IAdvertiseMyself,
6        &__uuidof(IAdvertiseMyself), &LIBID_PiSvrLib,
7        /* wMajor = */ 1, /* wMinor = */ 0>
8{
9//...
The added code is in bold. The wizard added the
IDispatchImpl template as a base class. This is used when
implementing dual interfaces. IAdvertiseMyself is
not a dual interface. The wizard
should have just derived from the interface directly. The fix is
easy: Change the previous bold line to this:
1public IAdvertiseMyself
Even with this bug, the
Implement Interface Wizard is still worth using for large
interfaces. In addition to updating the base class list and the
COM_MAP, the wizard provides skeleton implementation for
all the methods in the interface; for a large interface, this can
save a ton of typing. Unfortunately, the skeletons are added only
to the header file, not to the .cpp file.
For more information about the various ways that
ATL allows your COM classes to implement interfaces, see Chapter 6, “Interface Maps.”
For more information about CComBSTR and the
string-conversion routines used in the ShowAd method, see
Chapter 2, “Strings
and Text.”
Support for Scripting
Any time you run the ATL Simple Object Wizard
and choose Dual as the interface type, ATL generates an interface
definition for the default interface that derives from
IDispatch and is marked with the dual attribute,
and places it in the IDL file. Because it derives from
IDispatch, our dual interface can be used by scripting
clients such as Active Server Pages (ASP), Internet Explorer (IE),
and Windows Script Host (WSH). When our COM class supports
IDispatch, we can use objects of that class from scripting
environments. Here’s an example HTML page that uses an instance of
the CalcPi object:
 1<object classid="clsid:859512CF-E4D8-450C-AF09-6578FE2F6DC2"
 2        id=objPiCalculator>
 3</object>
 4
 5<script language=vbscript>
 6  ' Set the digits property
 7  objPiCalculator.digits = 5
 8
 9  ' Calculate pi
10  dim pi
11  pi = objPiCalculator.CalcPi
12
13  ' Tell the world!
14  document.write "Pi to " & objPiCalculator.digits & _
15    " digits is " & pi
16</script>
For more information about how to handle the
inconvenient data types associated with scripting – namely,
BSTR s and VARIANT s – see Chapter 2, “Text and Strings,” and Chapter 3, “ATL Smart
Types.”
Adding Persistence
ATL
provides base classes for objects that want to be persistentthat
is, saved to some persistence medium (such as a disk) and restored
later. COM objects expose this support by implementing one of the
COM persistence interfaces, such as IPersistStreamInit,
IPersistStorage, or IPersistPropertyBag. ATL
provides implementation of these three persistence
interfaces – namely, IPersistStreamInitImpl,
IPersistStorageImpl, and IPersistPropertyBagImpl.
Your COM object supports persistence by deriving from any of these
base classes, adding the interface to your COM_MAP, and
adding a data member called m_bRequiresSave that each of
these base classes expects.
 1class ATL_NO_VTABLE CCalcPi :
 2  public ICalcPi,
 3  public IAdvertiseMyself,
 4  public IPersistPropertyBagImpl<CCalcPi> {
 5public:
 6  ...
 7
 8  // ICalcPi
 9public:
10  STDMETHOD(CalcPi)(/*[out, retval]*/ BSTR* pbstrPi);
11  STDMETHOD(get_Digits)(/*[out, retval]*/ long *pVal);
12  STDMETHOD(put_Digits)(/*[in]*/ long newVal);
13
14public:
15  BOOL m_bRequiresSave; // Used by persistence base classes
16
17private:
18  long m_nDigits;
19};
However, that’s not quite all there is to it.
ATL’s implementation of persistence needs to know which parts of
your object need to be saved and restored. For that information,
ATL’s implementations of the persistent interfaces rely on a table
of object properties that you want to persist between sessions.
This table, called a PROP_MAP, contains a mapping of
property names and dispatch identifiers (as defined in the IDL
file). So, given the following interface:
1[
2object,
3...
4]
5interface ICalcPi : IDispatch {
6    [propget, id(1)] HRESULT Digits([out, retval] LONG* pVal);
7    [propput, id(1)] HRESULT Digits([in] LONG newVal);
8};
the PROP_MAP would be contained inside
our implementation of ICalcPi like this:
1class ATL_NO_VTABLE CCalcPi : ...
2{
3  ...
4public:
5BEGIN_PROP_MAP(CCalcPi)
6  PROP_ENTRY("Digits", 1, CLSID_NULL)
7END_PROP_MAP()
8};
Given an implementation
of IPersistPropertyBag, our IE sample code can be expanded
to support initialization of object properties via persistence
using the <param> tag:
 1<object classid="clsid:E5F91723-E7AD-4596-AC90-17586D400BF7"
 2        id=objPiCalculator>
 3        <param name=digits value=5>
 4</object>
 5
 6<script language=vbscript>
 7  ' Calculate pi
 8  dim pi
 9  pi = objPiCalculator.CalcPi
10
11  ' Tell the world!
12  document.write "Pi to " & objPiCalculator.digits &_
13    " digits is " & pi
14</script>
For more information about ATL’s implementation of persistence, see Chapter 7, “Persistence in ATL.”
Adding and Firing Events
When something interesting happens in a COM object, we’d like to be able to spontaneously notify its client without the client polling the object. COM provides a standard mechanism for sending these notifications to clients (normally called “firing an event”) using the connection-point architecture.
Connection-point events are actually methods on
an interface. To support the widest variety of clients, an event
interface is often defined as a dispinterface. Choosing
Support Connection Points in the ATL Simple Object Wizard generates
an event in our IDL file. The following is an example of the
wizard-generated code augmented with a single event method (shown
in bold):
 1[
 2    uuid(B830F523-D87B-434F-933A-623CEF6FC4AA),
 3    helpstring("_ICalcPiEvents Interface")
 4]
 5dispinterface _ICalcPiEvents {
 6    properties:
 7    methods:
 8    [id(1)] void OnDigit([in] short nIndex,
 9        [in] short nDigit);
10};
In addition to changing the IDL file, the
Support Connection Points option makes several changes to the class
definition. The IConnectionPointContainerImpl base class
is added. This class implements the
IConnectionPointContainer interface, providing
functionality for managing multiple event interfaces on the class.
The IConnectionPointImpl base class implements a
connection point for a specific event interface:
_ICalcPiEvents, in this case. The COM_MAP is also
modified to include an entry for
IConnectionPointContainer, and a new map, the
CONNECTION_MAP, is added to the class.
The wizard also generates a proxy class for the
connection point. This proxy class is added to the base class list
and provides a convenient way to actually fire the events (that is,
call the methods on the connection point). This is very helpful
because the typical connection point is a
dispinterface.
For example:
 1STDMETHODIMP CCalcPi::CalcPi(BSTR *pbstrPi) {
 2  // (code to calculate pi removed for clarity)
 3  ...
 4  // Fire each digit
 5  for( short j = 0; j != m_nDigits; ++j ) {
 6    Fire_OnDigit(j, (*pbstrPi)[j+2] - L'0');
 7  }
 8
 9  ...
10}
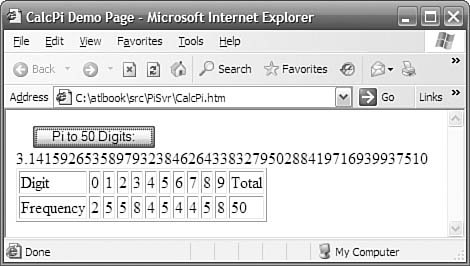
Objects of the CCalcPi class can now send events that can be handled in a page of HTML:
 1<object classid="clsid:E5F91723-E7AD-4596-AC90-17586D400BF7"
 2        id=objPiCalculator>
 3        <param name=digits value=50>
 4</object>
 5
 6<input type=button name=cmdCalcPi value="Pi to 50 Digits:">
 7<span id=spanPi>unknown</span>
 8
 9<p>Distribution of first 50 digits in pi:
10<table border cellpadding=4>
11... <!- table code removed for clarity >
12</table>
13
14<script language=vbscript>
15  ' Handle button click event
16  sub cmdCalcPi_onClick
17    spanPi.innerText = objPiCalculator.CalcPi
18  end sub
19
20  ' Handle calculator digit event
21  sub objPiCalculator_onDigit(index, digit)
22    select case digit
23    case 0: span0.innerText = span0.innerText + 1
24    case 1: span1.innerText = span1.innerText + 1
25    ... <! etc >
26    end select
27    spanTotal.innerText = spanTotal.innerText + 1
28  end sub
29</script>
The sample HTML page handles these events to provide the first 50 digits of pi and their distribution, as shown in Figure 1.11.
Figure 1.11. Pi to 50 digits
For more information about ATL’s support for connection points, see Chapter 9, “Connection Points.”
Using a Window
Because this is Microsoft Windows we’re
developing for, sometimes it’s handy to be able to put up a window
or a dialog box. For example, the MessageBox call we made
earlier yielded a somewhat boring advertisement, as shown in
Figure 1.12.
Figure 1.12. Boring message box
Normally, putting up a custom dialog box is kind of a pain. For the average Win32 programmer, either it involves lots of procedural code, which we don’t like, or it involves building a bunch of forwarding code to map Windows messages to member functions (a dialog box is an object, after all). As with MFC, ATL has a great deal of functionality for building windows and dialog boxes. To add a new dialog box, select Add Class from the Project menu and then select ATL Dialog from the list of available templates, as shown in Figure 1.13.
Figure 1.13. Inserting a dialog box class
![[View full size image]](_static/images/01atl13_alt.jpg)
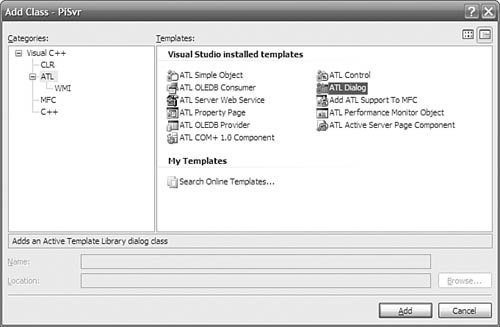
The ATL Dialog Wizard (see Figure 1.14) is much simpler than many other ATL class templates. It allows you to enter only C++ name information because a dialog box is a Win32 object, not a COM object.
Figure 1.14. ATL Dialog Wizard
![[View full size image]](_static/images/01atl14_alt.jpg)
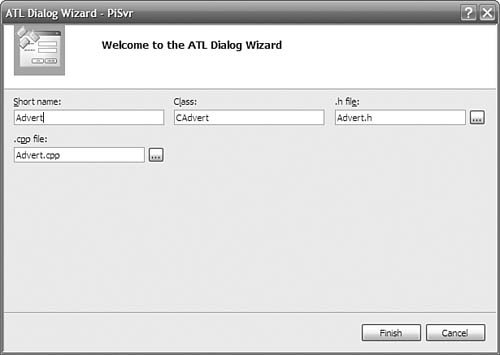
The generated code creates a class that derives
from CAxDialogImpl and uses a new dialog box resource,
also provided by the wizard. The derived class routes messages to
handlers using the MSG_MAP macros, as shown here:
 1class CAdvert : public CAxDialogImpl<CAdvert> {
 2public:
 3  CAdvert() {}
 4  ~CAdvert() {}
 5  enum { IDD = IDD_ADVERT };
 6
 7BEGIN_MSG_MAP(CAdvert)
 8    MESSAGE_HANDLER(WM_INITDIALOG, OnInitDialog)
 9    COMMAND_HANDLER(IDOK, BN_CLICKED, OnClickedOK)
10    COMMAND_HANDLER(IDCANCEL, BN_CLICKED, OnClickedCancel)
11    CHAIN_MSG_MAP(CAxDialogImpl<CAdvert>)
12END_MSG_MAP()
13
14  LRESULT OnInitDialog(UINT uMsg, WPARAM wParam, LPARAM lParam,
15                      BOOL& bHandled) {
16    if( m_bstrClient.Length() ) {
17      CComBSTR bstrCaption = OLESTR("CalcPi sponsored by ");
18      bstrCaption += m_bstrClient;
19
20      USES_CONVERSION;
21      SetWindowText(OLE2CT(bstrCaption));
22    }
23    return 1; // Let the system set the focus
24  }
25
26  LRESULT OnClickedOK(WORD wNotifyCode, WORD wID, HWND hWndCtl,
27     BOOL& bHandled) {
28    EndDialog(wID);
29    return 0;
30}
31
32  LRESULT OnClickedCancel(WORD wNotifyCode, WORD wID,
33    HWND hWndCtl, BOOL& bHandled) {
34    EndDialog(wID);
35    return 0;
36  }
37
38  CComBSTR m_bstrClient;
39};
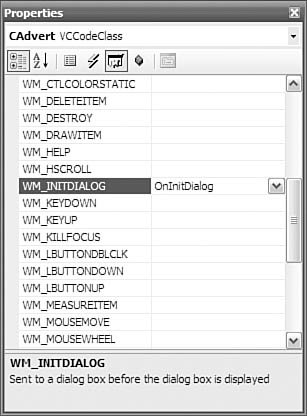
If
you want to handle another message, you can add the appropriate
entries to the message map and add the handler member functions by
hand. If you prefer, you can add a message handler by
right-clicking the name of the CAxDialogImpl-based class
in Class view, choosing Properties, and clicking the Messages
toolbar button. Figure
1.15 shows the resulting window.
Figure 1.15. Adding a Windows message handler
For more information on ATL’s extensive support for windowing, including building standalone Windows applications, see Chapter 10, “Windowing.”
COM Controls
COM controls are objects that provide their own
user interface (UI), which is closely integrated with that of their
container. ATL provides extensive support for COM controls via the
CComControl base class, as well as various other base
IXxxImpl classes. These base classes handle most of the
details of being a basic control (although there’s plenty of room
for advanced features, as shown in Chapter 11, “ActiveX Controls”). Had you
chosen ATL Control from the Add Class dialog box when generating
the CalcPi class, you could have provided the UI merely by
implementing the OnDraw function:
 1HRESULT CCalcPi::OnDraw(ATL_DRAWINFO& di) {
 2  CComBSTR bstrPi;
 3  if( SUCCEEDED(this->CalcPi(&bstrPi)) ) {
 4    DrawText(di.hdcDraw, COLE2CT(bstrPi), -1,
 5      (RECT*)di.prcBounds,
 6      DT_SINGLELINE | DT_CENTER | DT_VCENTER);
 7  }
 8
 9  return S_OK;
10}
The wizard would also have generated a sample HTML page, which I’ve augmented to take up the entire browser window and to set the initial number of digits to 50:
 1<HTML>
 2<HEAD>
 3<TITLE>ATL 8.0 test page for object CalcPiControl</TITLE>
 4</HEAD>
 5<BODY>
 6
 7<OBJECT ID="CalcPi"
 8    CLASSID="CLSID:9E7ABA7A-C106-4813-A50C-B15C967264B6"
 9    height="100%" width="100%">
10    <param name="Digits" value="50">
11</OBJECT>
12
13</BODY>
14</HTML>
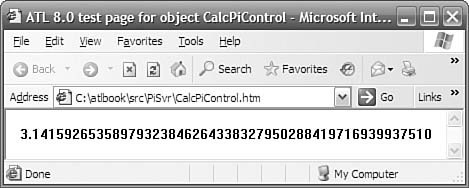
Displaying this sample page in Internet Explorer yields a view of a control (see Figure 1.16). For more information about building controls in ATL, see Chapter 11, “ActiveX Controls.”
Figure 1.16. The ``CalcPi`` control hosted in Internet Explorer
Hosting a Control
If
you want to host a control, you can do so with ATL’s
control-hosting support. For example, the Ax in
CAxDialogImpl stands for ActiveX control and indicates
that the dialog box is capable of hosting controls. To host a
control in a dialog box, right-click the dialog box resource and
choose Insert ActiveX Control. [5] This produces a dialog box
that lists the controls installed on your system, as shown in
Figure 1.17.
Figure 1.17. Insert ActiveX Control dialog box

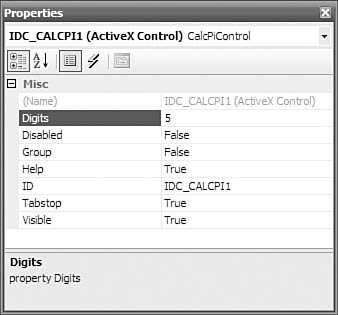
After you insert the control, you can click on it and set its properties in the Properties window, as shown in Figure 1.18.
Figure 1.18. Control Properties dialog box
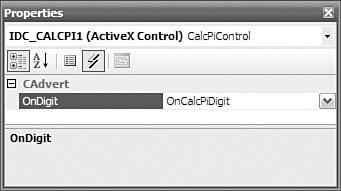
By clicking the Control Events toolbar button, you also can choose to handle a control’s events, as shown in Figure 1.19.
Figure 1.19. Choosing which control events to handle
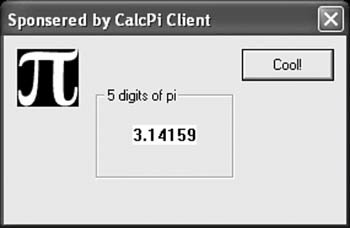
When the dialog box is shown, the control is created and initialized based on the properties set at development time. Figure 1.20 shows an example of a dialog box hosting a control.
Figure 1.20. A dialog box hosting a COM control
ATL provides support for hosting ATL controls not only in dialog boxes, but also in other windows, in controls that have a UI declared as a dialog box resource (called composite controls), and in controls that have a UI declared as an HTML resource (called HTML controls). For more information about control containment, see Chapter 12, “Control Containment.”
Being a C++ COM Client
COM and C++ go hand in hand – at least, theoretically. A COM interface maps directly to a C++ abstract class. All you need to do to use a COM object is run its IDL file through the MIDL compiler, and you’ve got a header file with all the information you need.
This worked well until the VB team asked if it could play with this COM stuff, too.
VB developers generally neither know nor want to know C++. And IDL is a language that’s very much in the C++ tradition, with lots of support for C/C++-specific things in it (such as arrays and pointers) VB needed a way to store type information about COM objects that VB developers could use and understand easily.
Thus was born the type library (a.k.a. typelib). A typelib stores information about a COM object: The classid, the interfaces that the object supports, the methods on those interfaces, and so onjust about everything you’d find in an IDL file (with some unfortunate exceptions, mostly having to do with C-style arrays). The COM system includes a set of COM objects that lets you programmatically walk through the contents of a typelib. Best of all, the typelib can be embedded into a DLL or EXE file directly, so you never have to worry about the type information getting lost.
The typelib was so successful for VB developers that many COM components these days aren’t shipped with an IDL file; the type library includes everything needed to use the components. Only one thing is missing: How do we use typelibs in C++?
The C++ language doesn’t understand typelibs. It
wants header files. This was such a serious problem that, back in
Visual Studio 6, Microsoft extended the compiler so that it could
use type libraries in much the same way that you use header files.
This extension was the #import statement.
#import is used much like
#include is. The general form is shown here:
1#import "pisvr.dll" <options>
The #import statement generates either
one or two C++ header files, depending on the options you use.
These header files have the extensions .tlh (for “typelib
header”) and .tli (for “typelib inline”) and are generated
into your project output directory (by default, Debug for a debug
build, Release for a release build).
The options on the #import line give
you a great deal of control over the contents of the generated
files. Check the Visual Studio documentation for the full list; we
talk about some of the more commonly used options here.
The no_namespace option tells the
compiler that we don’t want the contents of the generated files to
be placed into a C++ namespace. By default, the contents of the
generated files are placed in a C++ namespace named after the type
library.
named_guids instructs the compiler that
we want to have named symbols for the GUIDs in the type library. By
default, this would not compile because the name
CLSID_PISvr would not be defined:
1::CoCreateInstance( CLSID_PISvr, ... );
Instead, you have to do this:
1::CoCreateInstance( __uuidof( PISvr ), ... );
You also need to use __uuidof( ) to get
the IID for interfaces.
The raw_interfaces_only option requires
the most explanation. By default, when the #import
statement generates the header file, it doesn’t just spit out class
definitions for interfaces. It actually generates wrapper classes
that attempt to make a COM interface easier to use. For example,
given the interface:
1interface ICalcPi : IDispatch {
2  [propget, id(1), helpstring("property Digits")]
3  HRESULT Digits([out, retval] LONG* pVal);
4  [propput, id(1), helpstring("property Digits")]
5  HRESULT Digits([in] LONG newVal);
6  [id(2), helpstring("method CalcPi")]
7  HRESULT CalcPi([out,retval] BSTR* pbstrPi);
8};
Normal use of this interface would be something like this:
 1HRESULT DoStuff( long nDigits, ICalcPi *pCalc ) {
 2    HRESULT hr = pCalc->put_Digits( nDigits );
 3    if( FAILED( hr ) ) return hr;
 4
 5    BSTR bstrResult;
 6    hr = pCalc->CalcPi( &bstrResult );
 7    if( FAILED( hr ) ) return hr;
 8
 9    std::cout << "PI to " << nDigits << " digits is "
10        << CW2A( bstrResult );
11
12    ::SysFreeString( bstrResult );
13    return S_OK;
14}
When using the #import statement, on
the other hand, using this interface looks like this:
1void DoStuff( long nDigits, ICalcPiPtr spCalc ) {
2  spCalc->Digits = nDigits;
3  _bstr_t bstrResults = spCalc->CalcPi();
4  std::cout << "PI to " << spCalc->Digits << " digits is "
5    << ( char * )bstrResults;
6}
The
ICalcPiPtr type is a smart pointer expressed as a typedef
for the _com_ptr_t class. This class is not part of ATL; it’s part of the
Direct-To-COM extensions to the compiler and is defined in the
system header file comdef.h (along with all the other
types used by the wrapper classes). The smart pointer automatically
manages the reference counting, and the``_bstr_t`` type
manages the memory for a BSTR (which we discuss in
Chapter 2, “Strings
and Text”).
The most remarkable thing about the wrapper
classes is that the hrESULT testing is gone. Instead, the
wrapper class translates any failed HRESULT s into a C++
exception (the _com_error class, to be precise). This lets
the generated code use the method’s [retval] variable as
the actual return value, which eliminates a lot of temporary
variables and output parameters.
The wrapper classes can immensely simplify writing COM clients, but they have their downsides. The biggest is that they require the use of C++ exceptions. Some projects aren’t willing to pay the performance penalties that exception handling brings, and throwing exceptions means that developers have to pay very careful attention to exception safety.
Another downside to the wrappers for ATL
developers is that ATL also has wrapper classes for COM interfaces
(see Chapter 3, “ATL
Smart Types”) and BSTR s (see Chapter 2). The ATL wrappers are arguably
better than the ones defined in comdef.h; for example, you
can accidentally call the Release() method on an
ICalcPiPtr, but if you use the ATL wrapper, that would be
a compile error.
By default, you get the wrappers when you use
#import. If you decide that you don’t want them, or if for
some reason they don’t compile (which has been known to happen to
at least one of your humble authors on very complex and strange
typelibs), you can turn off the wrapper classes and just get
straight interface definitions by using the
raw_interfaces_only option.
ATL Server Web Projects
Without a doubt, the most dramatic recent addition to the ATL library is a suite of classes and tools collectively termed ATL Server. ATL Server accounts for nearly all of the fourfold increase in the overall size of ATL from ATL 3. This extensive class library provides comprehensive support for building web applications and XML web services. Although traditional ASP and the ASP.NET platform offer compelling and easy-to-use frameworks for web-based development, many application developers must still resort to raw ISAPI programming for applications that demand low-level control and maximum performance. ATL Server is designed to provide the performance and control of ISAPI with the feel and productivity of ASP. To that end, ATL Server follows the design model that has made conventional ATL development so effective over the years: namely small, fast, flexible code.
VS provides excellent wizard support for building web applications and web services. Walking through the numerous options available for ATL Server projects is actually quite insightful in understanding both the architecture and the sheer scope of the support provided. VS provides a wizard to help you get started building a web application with ATL Server. You launch this wizard by selecting the ATL Server Project option from the Visual C++ folder of the New Project dialog box.
The Project Settings tab shown in Figure 1.21 displays the selected options for generating and deploying the DLLs that comprise our web application.
Figure 1.21. Project settings for ATL Server project
![[View full size image]](_static/images/01atl21_alt.jpg)
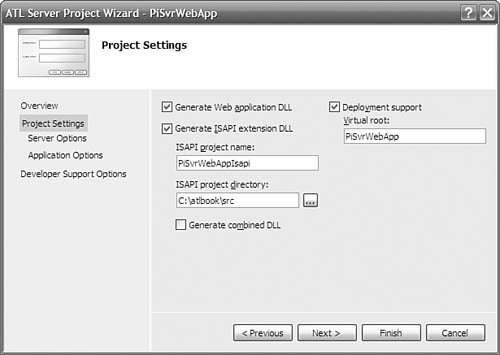
By default, ATL Server generates two projects in
your solution: a web application DLL and an ISAPI extension DLL.
ISAPI extension DLLs are loaded into the IIS process
(inetinfo.exe) and logically sit between IIS and your web
application DLL. Although ISAPI extensions can handle HTTP requests
themselves, it is more common for them to provide generic
infrastructure services such as thread pooling and caching, leaving
web application DLLs to provide the real HTTP response logic. The
ATL Server Project Wizard generates an ISAPI extension
implementation that communicates with special functions in your web
application called handlers. Figure 1.22 depicts this arrangement.
Figure 1.22. Basic ISAPI architecture
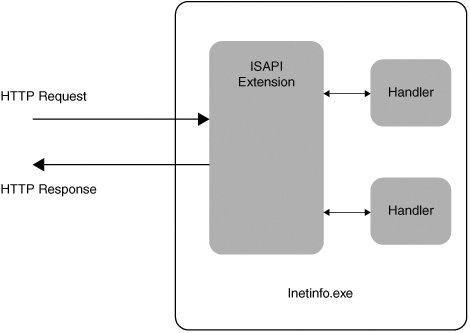
The Generate Combined DLL check box enables you to combine everything into a single DLL. This might be an appropriate option if the ISAPI extension is not intended to be used in other web applications. Conversely, developers can opt to leverage ATL Server’s extensibility features by creating specialized ISAPI extensions with such options as custom thread pooling, highly tuned caching schemes, or optimized state management. These ISAPI extensions would then likely be reused across multiple web applications. Furthermore, keeping the ISAPI extension as a separate DLL gives us the flexibility to add handlers to our web application without restarting the web server (handler classes are discussed shortly). We’ll leave the box unchecked for our first web application and allow VS to generate separate projects.
The Deployment Support check box enables the VS
web-deployment tool. With this option selected, the Visual Studio
build process automatically performs additional steps for properly
deploying your web application so that it is served by IIS. You’ll
see in a moment how convenient these integrated deployment features
can be. A brief word of caution at this point is in order, however.
The default setting to enable deployment support causes VS to
deploy the built project files in a subdirectory of your default
web site, typically <drive>:\inetpub\wwwroot. In a
real-world development scenario, it might be more desirable to
deploy in a different directory on the machine (such as the project
directory). Several steps are required to accomplish this, so for
now, we’re sticking with the default setting just so that we can
focus on developing our application.
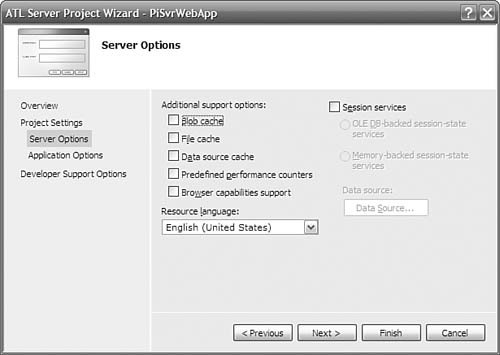
The Server Options tab shown in Figure 1.23 enables you to select various performance-oriented options for your web application. Several types of caching are supported, including support for arbitrary binary data (Blob cache), file caching, and database connection caching (Data source cache). Additionally, high-availability sites rely upon robust session-state management. ATL Server provides two mechanisms for persisting session state. The OLE DB-backed session-state services radio button includes support for persisting session state in a database (or other OLE DB data source), which is an option suited to applications running on web farms.
Figure 1.23. Server Options tab for ATL Server project
![[View full size image]](_static/images/01atl23_alt.jpg)
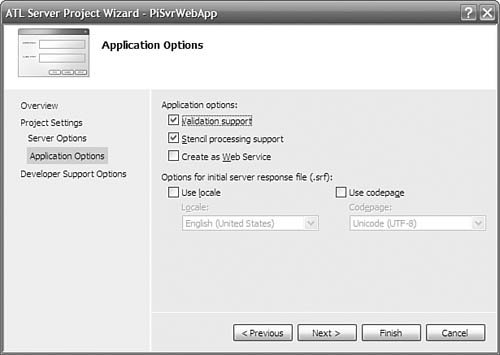
Figure
1.24 shows the selections available under the Application
Options tab. Validation Support generates the necessary code for
validating items in the HTTP request from the client, such as query
parameters and form variables. Stencil Processing Support generates
skeleton code for using HTML code templates known as server
response files (SRF). These text files (also known as stencils) end
with an .srf extension and intermix static HTML content
with special replacement tags that your code processes to generate
dynamic content at runtime. With stencil processing enabled, the
wizard also allows you to select the locale and codepage for
properly localizing responses. This simply inserts locale and
codepage tags into the generated SRF file. (More on using SRF files
comes shortly.) The Create as Web Service option also is discussed
further in the following section. Because we’re developing a web
application, we leave this box unchecked for now.
Figure 1.24. ATL Server Application Options tab
![[View full size image]](_static/images/01atl24_alt.jpg)
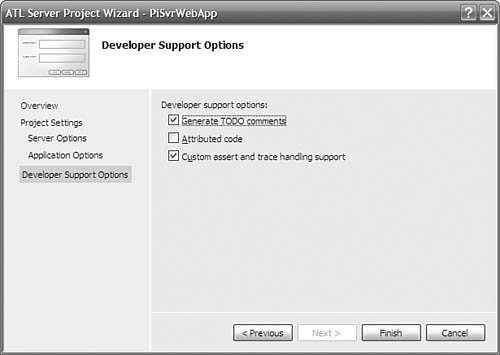
The remaining set of
options for your ATL Server project appears under the Developer
Support Options tab, shown in Figure 1.25. Generating TODO comments simply helps
alert the developer to regions of code where additional
implementation should be provided. If you select Custom Assert and
Trace Handling Support, debug builds of your project will include
an instance of the CDebugReportHook class, which can
greatly simplify the process of debugging your web applicationeven
from a remote machine.
Figure 1.25. ATL Server Developer Support Options tab
![[View full size image]](_static/images/01atl25_alt.jpg)
Pressing Finish causes the wizard to generate a
solution that contains two projects: one for your web application
DLL (with a name matching the <projectname> entered
in the New Project dialog box) and one for your ISAPI extension
(with a name <projectname>Isapi). Let’s take a look
at the code generated in the ISAPI extension project. The generated
.cpp file for our ISAPI extension looks like the
following:
 1class CPiSvrWebAppModule :
 2public CAtlDllModuleT<CPiSvrWebAppModule> {
 3public:
 4};
 5
 6CPiSvrWebAppModule _AtlModule;
 7
 8typedef CIsapiExtension<> ExtensionType;
 9
10// The ATL Server ISAPI extension
11ExtensionType theExtension;
12
13// Delegate ISAPI exports to theExtension
14//
15extern "C"
16DWORD WINAPI HttpExtensionProc(LPEXTENSION_CONTROL_BLOCK lpECB) {
17    return theExtension.HttpExtensionProc(lpECB);
18}
19
20extern "C"
21BOOL WINAPI GetExtensionVersion(HSE_VERSION_INFO* pVer) {
22    return theExtension.GetExtensionVersion(pVer);
23}
24
25extern "C" BOOL WINAPI TerminateExtension(DWORD dwFlags) {
26    return theExtension.TerminateExtension(dwFlags);
27}
28
29// DLL Entry Point
30//
31extern "C"
32BOOL WINAPI DllMain(HINSTANCE hInstance, DWORD dwReason,
33    LPVOID lpReserved) {
34    hInstance;
35    return _AtlModule.DllMain(dwReason, lpReserved);
36}
Because the ISAPI extension
uses the services of ATL for object creation, it needs an ATL
Module object. Also included in the generated code are
implementations of the three well-known entry points IIS uses to
communicate HTTP request information to the ISAPI extension:
HttpExtensionProc, GetExtensionVersion, and
TerminateExtension. These implementations simply delegate
to a global instance of CIsapiExtension, whose definition
is given here:
 1template <
 2  class ThreadPoolClass=CThreadPool<CIsapiWorker>,
 3  class CRequestStatClass=CNoRequestStats,
 4  class HttpUserErrorTextProvider=CDefaultErrorProvider,
 5  class WorkerThreadTraits=DefaultThreadTraits,
 6  class CPageCacheStats=CNoStatClass,
 7  class CStencilCacheStats=CNoStatClass
 8>
 9class CIsapiExtension :
10  public IServiceProvider,
11  public IIsapiExtension,
12  public IRequestStats
13{... }
This class provides boilerplate functionality
for implementing the ISAPI extension. The template parameters to
this class provide pluggable implementation for things such as
threadpool management, error reporting, and caching statistics. By
replacing this class in the .cpp file with your own
CIsapiExtension-derived class and providing your own
classes as template parameters, you can highly customize the
behavior of your ISAPI extension. Techniques for doing this are
presented in Chapter
13, “Hello, ATL Server.” The default implementation of the
ISAPI extension is suitable for our demonstration purposes
here.
Most of the action takes place in the web application project. The wizard generated a skeleton SRF file for us and placed it in the project. The HTML editor integrated into VS provides a convenient means of viewing and manipulating the contents of this file.
1<html>
2{{ handler PiSvrWebApp.dll/Default }}
3    <head>
4    </head>
5    <body>
6        This is a test: {{Hello}}<br>
7    </body>
8</html>
Items that appear within double braces indicate
commands that are passed to the stencil processor. The
{{handler}} command specifies the name of the DLL that
houses our handler classes for processing replacement tags that
appear in the SRF file. The /Default specifier identifies
the default request-handler class to use for processing replacement
tags. In general, an application DLL can contain multiple handler
classes for processing SRF commands, and these classes can even
exist in multiple DLLs. We use only a single handler class in a
single application DLL, so all commands destined for handler
classes will be routed to the same handler class. In the earlier
wizard-generated skeleton, the {{Hello}} tag will be
passed on to a handler class and replaced by the HTML produced from
that class’s replacement method.
ATL Server uses several macros to map commands
in the SRF file to handler classes in our application DLL. The
class definition generated for us in the
<projectname>.h file shows how these macros are
used:
 1class CPiSvrWebAppHandler
 2    : public CRequestHandlerT<CPiSvrWebAppHandler>
 3{
 4public:
 5    BEGIN_REPLACEMENT_METHOD_MAP(CPiSvrWebAppHandler)
 6        REPLACEMENT_METHOD_ENTRY("Hello", OnHello)
 7    END_REPLACEMENT_METHOD_MAP()
 8
 9    HTTP_CODE ValidateAndExchange() {
10        // Set the content-type
11        m_HttpResponse.SetContentType("text/html");
12        return HTTP_SUCCESS;
13    }
14
15protected:
16    HTTP_CODE OnHello(void) {
17        m_HttpResponse << "Hello World!";
18        return HTTP_SUCCESS;
19    }
20};
The CRequestHandlerT base class
provides the implementation for a request-handler class. It uses
the REPLACEMENT_METHOD_MAP to map the strings in
replacements in the SRF file to the appropriate functions in the
class.
In addition to the request-handler class itself,
in the handler DLL’s .cpp file, you’ll find this
additional global map:
1BEGIN_HANDLER_MAP()
2    HANDLER_ENTRY("Default", CPiSvrWebAppHandler)
3END_HANDLER_MAP()
The HANDLER_MAP is
used to determine which class to use to process substitutions given
with a particular name. In this case, the string "Default"
as used in the handler tag in the SRF file is mapped to the
CPiSvrWebAppHandler class. When the {{Hello}} tag
is encountered in the SRF file, the OnHello method is
invoked (via the REPLACEMENT_METHOD_MAP). It uses an
instance of CHttpResponse declared as a member variable of
the CRequestHandlerT to generate replacement text for the
tag.
Let’s modify the wizard-generated code to display pi to the number of digits specified in the query string of the HTTP request. First, we modify the SRF file to the following:
1<html>
2{{ handler PiSvrWebApp.dll/Default }}
3    <head>
4    </head>
5    <body>
6        PI = {{Pi}}<br>
7    </body>
8</html>
We then add a replacement method called
OnPi to our existing handler class and apply the
[tag_name] attribute to associate this method with the
{{Pi}} replacement tag. In the implementation of the
OnPi method, we retrieve the number of digits requested
from the query string. The CHttpRequest class stored in
m_HttpRequest member variable exposes an instance of
CHttpRequestParams. This class provides a simple
Lookup method to retrieve individual query parameters from
the query string as name-value pairs, so processing requests such
as the following is a simple matter:
1http://localhost/PiSvrWebApp/PiSvrWebApp.srf?digits=6
The OnPi method implementation to field
such requests follows:
 1class CPiSvrWebAppHandler {
 2...
 3    HTTP_CODE OnPi(void) {
 4        LPCSTR pszDigits = m_HttpRequest.m_QueryParams.Lookup("digits");
 5        long nDigits = 0;
 6        if (pszDigits)
 7            nDigits = atoi(pszDigits);
 8        BSTR bstrPi = NULL;
 9        CalcPi(nDigits, &bstrPi);
10
11        m_HttpResponse << CW2A(bstrPi);
12        return HTTP_SUCCESS;
13    }
14...
15};
When we build our
solution, VS performs a number of convenient tasks on our behalf.
Because this is a web application, simply compiling the code into
DLLs doesn’t quite do the trick. The application must be properly
deployed on our web server and registered with IIS. This involves
creating a virtual directory, specifying an appropriate level of
process isolation, and mapping the .srf file extension to
our ISAPI extension DLL. Recall that when we created the project,
we chose to include deployment support on the Project Settings tab
of the ATL Server Project Wizard, shown previously in Figure 1.25. As a result, VS
invokes the VCDeploy.exe utility to automatically perform all the
necessary web-deployment steps for us. Simply compiling our
solution in the normal manner places our application DLL, our ISAPI
extension DLL, and our SRF file in a directory under our default
web site, typically ending up in the directory
<drive>:\inetpub\wwwroot\<projectName>. VS
uses our web application project name as the virtual directory
name, so browsing to
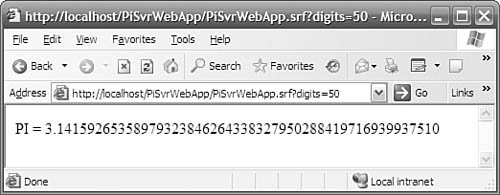
http://localhost/PiSvrWebApp/PiSvrWebApp.srf?digits=50
produces the result in Figure
1.26.
Figure 1.26. Web application for displaying pi to 50 digits
![[View full size image]](_static/images/01atl26_alt.jpg)
For more information about building ISAPI applications, including web services, with ATL Server, see Chapter 13, “Hello, ATL Server.”
Summary
This chapter has been a whirlwind tour through some of the functionality of ATL that the wizards expose, as well as some of the basic interface implementations of ATL. Even with the wizards, it should be clear that ATL is no substitute for solid COM knowledge. You still need to know how to design and implement your interfaces. As you’ll see throughout the rest of this book, you still have to know about interface pointers, reference counting, runtime type discovery, threading, persistence … the list goes on. ATL can help, but you still need to know COM.
It should also be clear that the wizard is not a substitute for intimate knowledge of ATL or web application development. For every tidbit of ATL information shown in this chapter, there are 10 more salient details, extensions, and pitfalls. And although the wizard saves you typing, it can’t do everything. It can’t make sure your design and implementation goals are met: That’s up to you.